Lab One: Introduction to BYOB - Animations and Communication
Background
Initially rogramming exercises in this class will be done using BYOB, an extension to the Scratch programming environment. Scratch was developed at MIT, and is designed to be an easy-to-use environment for creating animations and simple games .
The BYOB project extends Scratch by adding some advanced features, including the ability to create your own programming puzzle pieces, or blocks, which is the source of the name. This capability allows a programmer to do the kind of top-down design that is vital to modern programming, and allows the use of recursion and other powerful programming techniques which will be introduced later in the course.
Activities
To complete this lab, you must complete four specific activities -for each activity there is a minimum set of required activities, and you are encouraged to explore beyond the minimum required to see what you can discover and create. You cannot hurt anything by exploring, so feel free to click on different items in the BYOB interface to see what they will do. We provide some suggestions of other activities to try, but do not feel constrained by the suggestions.
Activity 1: Meet BYOB
To start the BYOB environment, select BYOB from the BYOB folder in the Start menu (assuming a Windows system) -on some systems there might also be a shortcut on the desktop that you can double-click. This will open up the BYOB interaction window, which has 5 distinct areas which are called panes (as in “panes in a window”), shown in the following picture:
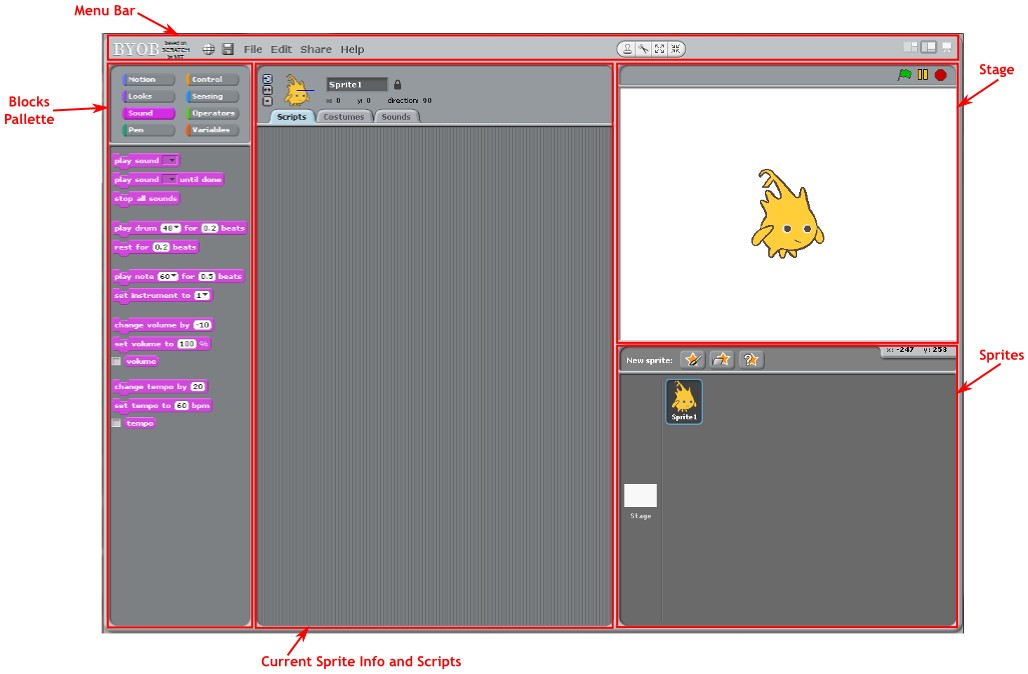
The most fundamental item in BYOB is a “sprite.” A sprite is an object that can be programmed as far as how it looks (called the sprite’s “costume”), sounds it can make, and actions (or “scripts”) that control its behavior. The middle and largest area of the BYOB window shows information on the currently-selected sprite, so it’s called the “sprite info pane”notice the three tabs in the sprite info pane identifying these three components of the current sprite. Try clicking on each one to see what it displays. This sprite comes up by default when BYOB is started, and the “costume” -the appearance -is the BYOB mascot, named “Alonzo.” To start with, this sprite has no scripts defined, and no sounds, and only one costume.
In the lower-right of the BYOB window is the sprite selection area, or the “sprites pane”. There is only one sprite to start with (named “Sprite1”), but notice that there is another item displayed named “Stage” -this represents the area in which your program/animation will play out, which is actually located in the upper-right area of the BYOB window. If you select “Stage” you’ll notice that it looks very similar to a sprite, but the “Costumes” tab is replaced with a “Backgrounds” tab -this is how you set the background of your stage!
To Do: Create a second sprite in the basic setup. There are three ways to do this, using the three buttons at the top of the sprites pane -the first button (the star with the paintbrush) allows you to draw whatever picture you want; the second button (the star with the folder) allows you to load a sprite picture from a file; the third button (the star with the question mark) gives you a random picture. If you forget what these do, you can “hover” the mouse pointer over any button and it will give you a description of what the button does. For our first experiment, let’s load a sprite from a file, so click on the star with the folder. Are you curious about what’s in all of those folders? Click on any of the folders and look through the sprites that are available -if you enter a folder and want to return to where you were before, you can click the up arrow. After you click around a bit to get familiar with what’s there, pick one particular sprite that you like -for example, let’s pick “dragon1-a” under “Fantasy.” If you do this, it will create a new sprite in the sprites pane, and it will draw it on the stage -centered, so it’s right on top of Alonzo! You can use the mouse to move these around on the stage, so move them so that the dragon is to the right of Alonzo. Your stage should now look like this:
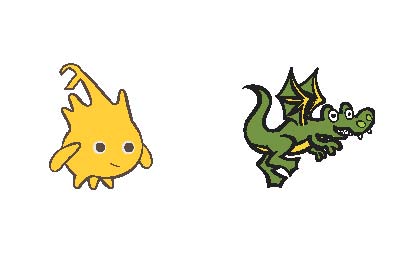
Note that by clicking on the sprite in the sprites pane, you select that sprite for the middle sprite info pane. Only one sprite can be selected for that area at a time, so you can only work on one sprite at a time.
The other panes of the BYOB window are the block palette and the menu bar. We’ll talk about the block palette below, but take a look at the menu bar now. It’s a pretty standard application menu bar, with a File menu, Edit menu, etc. There are also some buttons off to the right that are important: on the far right side of the menu bar are three buttons that control the size of the stage. By default the stage is “medium sized”, but can be made small (the first button), or full-screen (the last button). Experiment with these -note that to exit full-screen mode, you press the “Esc” key.
We’d like for our dragon to talk to Alonzo, but unfortunately, it is facing the wrong way! How can we fix this? We need to edit the sprite’s look, or costume -select the dragon sprite in the sprites pane, and then select the Costumes tab in the middle area. This will show the “dragon1a” costume, along with “Edit” and “Copy” buttons. Click on “Edit” and the image editor will pop up. The window that pops up should look familiar if you’ve ever used a paint or an image editing program on a computer, but the editor that comes with BYOB does not have all the features of a full-blown image editor -if you want to do anything particularly fancy, you can export the costume to a file (right click on the costume to see the export option), edit using a program like Photoshop or GIMP, and then import the modified version back into your project. The action buttons include one that looks like
You hover the mouse over this button you’ll see the hint that lets you know that this will flip the image horizontally, which is what we want to do. Click the button, and you’ll see that the dragon is now facing to the left, so it can talk to Alonzo!
Finally, try the “File” menu and select “Save As...” -this will prompt you for a name for your project, which in this case consists of just two sprite definitions, and will save it. Go ahead and save this as Lab1-v1 -then exit BYOB and restart, so that you see only the default project with Alonzo, and then use “File / Open” to restore your previous project to the workspace. Now you know how to save your work so you can resume later.
Activity 2: Basic Animation
In this activity, we’ll explore the blocks palette to add some actions to our sprites. There are a lot of different actions that can be programmed in a sprite, so in order to organize things in a reasonable way the blocks are organized into eight different types of blocks, or categories, indicated by the different colored blocks at the top of the block palette. These categories are motion, looks, sound, pen, control, sensing, operators, and variables. We will make the dragon talk by adding a talking “bubble” (comic strip style).
To Do: First, get the BYOB workspace into a state that we can work with: Make sure the dragon is selected in the sprites pane, and select the “Scripts” tab in the sprite info pane. Finally, click the purple “Looks” button at the top of the blocks palette. Each of the blocks that is displayed will somehow alter the way the dragon looks -if you want to see what they do, you can click on the block in the block palette. For example, click the “hide” block, and the dragon will disappear! Don’t worry -the dragon hasn’t been deleted, it’s just (temporarily) not displayed on the stage. Click the “show” button, and it will re-appear! Click the “Change size by …” button a few times and watch the dragon grow in size -you can undo these changes by clicking the “set size to 100%” button, which will reset the size to normal. Most blocks have parts that can be changed, called parameters -for example, the “change size by...” block has a single parameter, which controls how much the size is changed by. The value sent to the block (like the number 100) is called an argument. If you don’t understand the difference between a parameter and an argument, don’t worry about it for now -we’ll get back to it later in the class when defining our own blocks, and it should make more sense in that context.
Now click the “say Hello! for 2 secs” button to see how to make the dragon say something. After 2 seconds (do you see why?) the speech bubble will disappear.
Obviously, if you had to go through and click each button to cause each action, it would be really tedious. Scripts are a way of chaining actions together to form more complex actions, and
to define actions that should be performed in response to user actions or other events. To start, drag the “say Hello! for 2 secs” over to the sprite info pane (if you followed the directions above, the “Scripts” tab should be selected in that pane). Next, drag the same block over to the middle area again -when you get near the first block you placed, a highlight bar will appear either above or below the existing piece, and if you release it when the bottom edge is highlighted the new piece will “snap” into place on that side of the existing piece. Once you have snapped these two pieces together, click on the first parameter (“Hello!”) in the bottom block, and change the text to “I’m a dragon”. Your two-block component should now look like this:

This is now a sequence of two actions which will be done in sequence. Click on any of the purple parts, and you’ll see the first speech bubble appear with “Hello!”, and then two seconds later it will be replaced by a second bubble that says “I’m a dragon”. Note that you can adjust the timing by clicking on either of the numbers and adjusting the number of seconds that the bubble is displayed -these don’t need to be whole numbers, so you could have “Hello!” only appear for 0.5 seconds if you’d like. Play around with this a little bit to get the timing the way you like it.
Try switching between sprites in the sprites pane, and notice that these blocks that you drug out are only visible when the dragon is selected. We say that this script is local to the dragon sprite, meaning that they are attached to that specific sprite and blocks like “say” operate only on that sprite. If you want another sprite to say something, you must select that other sprite and add blocks to its local scripts.
Next, add another “say” block below these to say “Want to see me breathe fire?” for 2 seconds (or however long you’d like). Now you should have a sequence of three speech bubbles -and now we want the dragon to breathe fire! To do this, we need to change the dragon’s picture to include fire -recall that the dragon’s picture is called its “costume,” so click on the “Costumes” tab on the center area. Click the “Import” button at the top, and you’ll see the same file browser that you saw when you first created the dragon sprite; however, now when you click on an image it will not create a new sprite, but rather add an alternate costume for the current sprite. Find the picture of the dragon breathing fire (it’s called “dragon1-b”) and select it -once it’s loaded as a costume, you’ll notice that it is facing the wrong way, just like our original dragon picture. Do you remember how to flip the picture horizontally? Do it!
Now you have two different costumes for the dragon, and we’ll have the regular dragon switch to the fire breathing dragon after the third speech bubble. To do this, switch back to the dragon’s “Scripts” tab, and drag the “switch to costume...” block out and put it under the speaking blocks. Make sure the costume name to switch to says “dragon1-b”, and now run the 4-block component by clicking on a purple part. Cool!
The problem now is that the dragon is left breathing fire -we would like the fire breathing to be temporary, so add another “switch to costume...” block under the last one, and switch back to >the normal dragon. Finally add a “say” block to say “Isn’t that cool?” Now your script should look like this:
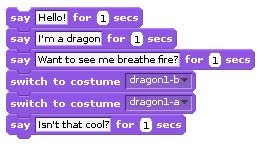
Run the script -did you see the fire? Better look fast! What’s the problem?
The problem is that you switch costumes twice in a row, at computer speed, so you the fire breathing flashes by so fast that it’s difficult to see. This is a place where we want to put in a delay, so that we can slow down the sequence to see the effects of one block before going right into the next one. The block we need is a “Control” block, so click the orange “Control” button at the top of the block palette. Find the block that says “wait for 1 secs” and drag it out -position it carefully so that it goes between the two costume change blocks, so that your script looks like this:
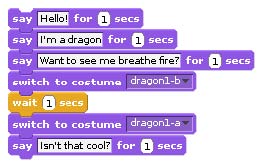
Now run it -looks better, right?
Next, let’s try adding motion by having the dragon move up and down slightly, imitating a hovering look. Positions on the stage are given using x,y coordinates, just like x/y-axis graphs that you’ve seen in math classes. The center of the stage is location (0,0), and positive x values go to the right, and positive y values go up. The stage is 479x359, meaning that x coordinates vary from -239 to +239, and y coordinates vary from -179 to +179. You can see the current position of the selected sprite in the sprite info pane, at the top -right above the tabs it will say something like x: 120 y: 2 direction: 90 Your numbers will probably be different, and we won’t worry about the “direction” for now, but this tells me that my dragon is at position (120,2). Grab the dragon picture and move it around, and you’ll see these coordinates change -after moving the dragon around, leave it in a reasonable starting position for this animation. Now click the “Motion” button at the top of the block palette, find the button that says “go to x: 120 y: 2” (again, your numbers will probably be different). Drag this block out to the Scripts tab for your dragon, and place it down, but do not connect it to the previous component -just drop it in a clear spot of the scripts area. If the
numbers in this block do not match your current dragon position, change them to match. Now what happens if you click this block? If you did everything right, nothing will happen -it “move” the dragon to the same position it’s currently in -why would you want to do this?
The answer to that last question is this: When an animation ends, if sprites have been moving around, they will be in unpredictable positions. To start the animation with sprites in the correct positions, you should always put one of these “go to” blocks at the beginning of your motion sequence.
Next we want to move the dragon up and down, as if it is hovering. To do this, drag the “glide” block out and click it below the “go to” block. The first number controls the speed (the time, in seconds, of the glide), and the last numbers give the final location of the end of the glide path. We want the dragon to go up a little, so set the (x,y) coordinates at the end of the glide path to the same x value as the beginning position, and the y coordinate to be 10 greater -for example, if the starting position is (120,2), then you should glide to (120,12). Finally, put another glide block below this one to glide back to the original position, and experiment with time values to get a something that looks right to you. For example, your final movement block might look like this:

Next we want to keep doing these operations over and over. Going back to the “Control” blocks, find the “forever” block. Note that this block looks different from the ones you’ve used before -it’s a “C block” (named after its shape), and has other blocks not only before and after it, but also inside it. The effect of this particular block is to repeat the sequence of actions inside it over and over -forever! If you’re careful about how you move it out, you can click it around the two “glide” blocks so that it looks like this:
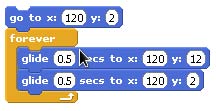
Now click at the beginning, and the dragon will float up and down repeatedly. This will go on forever (that’s the name of the block!) unless you stop it, which is what the red stop-sign button at the top right of the stage does. Try starting and stopping this a few times to see how this works.
Finally, in an animation, we don’t really want to start a single sequence of operations -we want to start the entire animation at once. We have defined two sequences of actions now: the speaking and fire breathing sequence, and the flying sequence. Drag out the “When (green flag) clicked” block (in the control category) out and put it at the top of both of these sequences, and put the “stop all” (also in the control set) out and put it at the end of the speech sequence. Now you have two blocks that look like this:
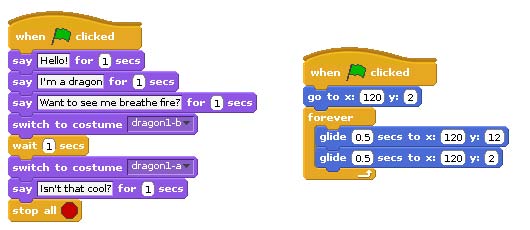
Now click the green flag above the stage, and both sequences will be run. The dragon will fly up and down while it is talking and breathing fire!
Now that you’ve done all of this, use “Save as...” to save this project as Lab1-v2.
Activity 3: Coordinating Multiple Sprites
So far, only our dragon has done anything -what about Alonzo? Let’s have Alonzo say something after the dragon says “I’m a dragon” and before she says “Want to see me breathe fire?” Switch over to the Alonzo sprite, and add a script that does the following:

Tip: If you need to change several parameters, click on the first one -in this example, it is to change the first text to “Hi, I’m Alonzo.” After you type the text, you don’t need to take your hands off the keyboard to select the next parameter with the mouse -just hit the “Tab” key and it will switch over to the next parameter, which you can type in. It’s often faster to drag a bunch of blocks that you need out, snap them together without worrying about the arguments, and then change all the parameters at once by tabbing between them.
The problem is to figure out how to make Alonzo say this at the right time. If you had him say it when the green flag was pressed, he’d be talking at the same time as the dragon (try it!). The answer to this problem is to have the sprites “signal” each other when they get to different parts of their scripts.
What we need is a way for the dragon to signal Alonzo that it is finished talking, and is ready for Alonzo to talk (isn’t that polite and civilized? sometimes these signals in real life would help!). This is precisely what “broadcast messages” are for -to allow sprites to signal each other about certain events.
To Do: On the scripts page for the dragon, use the mouse to grab the block where the dragon says “Want to see me breathe fire?” and drag it away -notice how this separates that block and
everything below it from the big dragon script. Now, in the blocks palette, select the “Control” category, and drag the “broadcast” block out to add to the dragon’s initial dialog script. The only parameter in the broadcast block is blank (unless you have been experimenting with messages already!), so click on it and select “New” from the popup menu. You should now be prompted for a message name -any sprite can send a message for any reason, which is hard to keep track of in a complex animation, so it is important to give messages meaningful names that help you remember their purpose. For example, what we want to signal here is that the dragon is done speaking for the first time, so let’s call this message “Dragon Done 1” -your first dragon script block should now look like this:
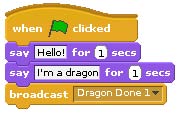
Note that you can also name sprites, so changing those names from “Sprite1” and “Sprite2” to something more meaningful (like “Alonzo” and “Dragon”) would be a good idea.
Now that the dragon can broadcast a message, there needs to be some way to receive that message and make it trigger an action. For this, use the “when I receive...” block -switch over to Alonzo, separate the actions from the “when green flag clicked” block (if you put that block in), and start Alonzo’s dialog with the “when I receive...” block -you should select the “Dragon Done 1” message for this block’s parameter. Next, put another broadcast block at the end of Alonzo’s dialog, named something like “Alonzo Done 1” -now Alonzo’s script should look like this:
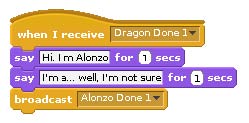
Finally, remember those blocks that you separated from the dragon’s script at the beginning of this activity? Make them run when they receive the “Alonzo Done 1” message. If you have done all of this correctly, then you can click the green flag, and you will have an animation of a synchronized dialog between Alonzo and the dragon, while the dragon is flying and breathes fire. Not exactly a Pixar short, but still pretty cool for a first try! Save this project as Lab1-v3.
Activity 4: Get Creative!
You have now experimented with the basics of BYOB, and should have a decent understanding of what sprites are and how you can program them with sequences of actions. Now you should play around with this to see if you can animate something of your choosing -for example, take a brief exchange from a movie or a TV show, or make something up. You can do whatever you want, but must satisfy the following minimum requirements: you must have at least two characters (i.e., sprites) in your animation, each must have at least two distinct sequences of actions (e.g., dialog sequences), and the actions of the two characters must be coordinated with each other using broadcast signals. Browse through the available sprite images for fun characters, or if you’re really ambitious see if you can get images from the Internet imported as sprite costumes. And most importantly: Have fun with it! Save your creation as Lab1myscript.
As a final note, there are a lot of examples that you can access under “File / Open” and selecting the “Examples” button on the left. These use a lot of features we haven’t worked with yet, but it is still interesting to click through the examples and see what’s there.
Discussion
Beyond learning the basics of BYOB, there are a few important concepts that you were exposed to in this assignment, which are discussed here.
Problem Decomposition: This is the fancy way of saying that a big problem was broken down into smaller pieces that could be tackled individually. Our final Alonzo/Dragon conversation involved several pieces: Alonzo and the dragon talking, and the dragon flying. When you think about writing a program like this, your first step should be to identify all the pieces that can operate independently -don’t think of it as one big program, but think “the dragon will say these things before waiting for a response,” and “the dragon will fly while all of this is going on.” Not only does this help you think about solving the problem, since you’re working on smaller problems, but it also allows you to develop small pieces that can be constructed and tested individually before being put together in a larger program. This is one of the most important skills for a software developer: something like Microsoft Windows has tens of millions of lines of code (individual instructions), but in the design of the system it is decomposed into components that individual teams or programmers can work on independently. Imagine how impossible it would be if all the programmers had to work on the program as one big chunk of code! If you study more about construction and testing of large software systems, some terms that come up include top-down design (starting at the overall idea for your program and breaking it down into smaller pieces, and then those down into smaller pieces, and then those...), unit testing (testing individual pieces to make sure they work on their own), integration testing (making sure those individual pieces work together properly), and system testing (making sure the final product works as required).
Event-driven Programming: Each set of blocks you put together was “triggered” by something for it to start running, whether it was pressing the green flag or receiving a broadcast message. This style of programming is called “event-driven programming” and is common for highly interactive programs. Programming graphical user interfaces (GUIs) is an example of something that is highly event-driven -the programmer defines the interface elements (drop down menus, buttons, etc.) and then defines actions that are executed when these elements are interacted with (e.g., a button is pressed). Not all programming is like this, however -large computational tasks, like simulating a galaxy, do lots of computational number-crunching through well-defined operations, and there are no events to respond to. Picking the right style
of programming is something that people get better at once they get experience in the different styles.
Concurrency: Concurrency means that different tasks are happening at the same time. For example, the sequence of instructions for the dragon talking are being executed at the same time as the sequence of instructions for the dragon flying. Notice that concurrency is very natural in BYOB: different actions that are triggered by the same event (like pressing the green flag) happen at the same time. What is interesting is that while this is very natural in BYOB and Scratch, more “advanced” programming languages like C++ or Python do not support concurrent operations in nearly as clean and nice a fashion. However, that’s also understandable: concurrency in large systems, where many very complex actions can be happening at the same time, can be difficult to design and test. A final note on concurrency: You could define a dozen concurrent tasks in Scratch, and they would all execute concurrently how does it do this if there is only one processor in the computer? The answer is that, unseen to you, the computer is not really executing all of these at the same time. It will execute one task for a very small amount of time (like a hundredth of a second), and then execute another one for a small amount of time, and will keep alternating between these tasks so quickly that it looks like they are all happening at the same time to you -this is similar to playing a movie, where individual still pictures are flashed before you at a fast enough rate to give you the impression that there is motion. Modern processors also have limited capabilities for actually executing multiple things at the same time -for example, a “quad-core” processor could actually be running four tasks simultaneously. However, if you have 12 tasks defined, then each core could be switching rapidly between three different tasks.
Versioning: As you added more and more functionality to the animation with Alonzo and the dragon, you saved several times, with names “Lab1-v1”, “Lab1-v2”, and “Lab1-v3”. One reason for this is that to turn in all three versions, you need different file names. However, if your initial goal was just to produce the final animation and not to document your work in the lab, you still might save multiple copies -or versions -like this, since it allows you to go back to a previous version if you decide you don’t like your most recent additions. This is a very common practice, in both programming and general computer work -for example, when multiple people are collaboratively working on a word-processing document, it is common for people to save new versions with the date appended to the filename. By writing the date in the order year-monthdate, a sorted list of files by filename will provide them in order. For example, the file named “Proposal-2012-05-23.doc” would be the version of the proposal written on May 23, 2012. Another common versioning practice is for authors to put their initials at the end of the filename, so you might know that a particular version was edited by “srt” (for example). Finally, professional software development teams often use software called “Version Control Systems” (VCS) which take care of versioning automatically -when software is saved (or “committed”) to a VCS it is automatically assigned a new version number. Previous versions can always be accessed, and VCS systems always provide a way to reconcile and merge changes that are made by different team members.
Terminology
The following terms were introduced in this lab.
| ● | Alonzo: The BYOB mascot, and the first sprite that appears by default in an empty |
| project. | |
| ● | argument: A value that is provided for a parameter. |
| ● | block palette: The left-most pane of the BYOB window, that contains all of the blocks |
| that can be used in your scripts. | |
| ● | broadcast message: A message sent out by a script, which can be received by other |
| scripts. This is useful for synchronizing between scripts or sprites. | |
| ● | BYOB: An enhanced version of the Scratch programming environment. Scratch was |
| developed at MIT, and the BYOB extensions were developed at the University of | |
| California at Berkeley. | |
| ● | C block: A block that is shaped like the letter C, so that other blocks can be put inside it |
| and are then controlled by the C block. | |
| ● | category: Blocks belong to a category (such as “motion” or “looks”) that describes what |
| they do -the blocks palette is organized by category to make it easier to find blocks. | |
| ● | concurrency: Multiple actions happening (or appearing to happen) at the same time. |
| ● | costume: A graphical representation of a sprite. Sprites can have multiple costumes if |
| they have different looks throughout the course of a program, and the sprite switches | |
| between costumes to change its looks | |
| ● | event-driven programming: A style of programming in which scripts are designed to |
| respond to events, such as keys being pressed, or broadcast messages being received. | |
| ● | local: An item (script, variable, etc.) that is only defined in a limited context, like a script |
| that is defined only for a specific sprite. | |
| ● | menu bar: The narrow area across the top of the BYOB window that gives access to |
| drop-down menus for loading or saving projects, setting options, etc. | |
| ● | pane: An area of a window that serves a specific purpose, like selecting the current |
| sprite (in the “sprites pane”) or showing/defining characteristics of the current sprite (in | |
| the “sprite info pane”). | |
| ● | parameters: Positions in a block that define values that can be changed for different |
| instances of the block. | |
| ● | problem decomposition: The process of taking a complex task, and breaking it down |
| into simple pieces that can be worked on independently. | |
| ● | script: Sequences of actions that can be initiated either by the programmer or by some |
| event in the program (the green start flag being clicked, receiving a broadcast message, | |
| the user pressing a key, etc.). | |
| ● | sprite: A character or other object that has (optionally) actions/scripts, costumes, and/or |
| sounds associated with it. | |
| ● | sprite info pane: The center pane of the BYOB window, where you can define scripts, |
| costumes, and sounds for that sprite. | |
| ● | sprites pane: The lower-right part of the BYOB window, where you can select a sprite to |
| make the current sprite. | |
| ● | stage: The space where your actions play out, and scripts are drawn. The stage can have a background that then is shown behind any sprites that are on the stage. |
| ● | versioning: Using separate files to save a project as it develops |
| ● | complex. This is useful if you ever have to return to (or “revert to”) an older version. |
| version control systemversion control system: A software system that manages versions of files in a possibly | |
| complex project. |
Submission
In this lab, you should have saved the following files: Lab1-v1, Lab1-v2, Lab1-v3, and Lab1myscript.
See assignment document for submission requirements.